Equipment
- Large mixing bowl
- Electric mixer (hand or stand mixer)
- 12-inch pizza stone or large baking sheet
- Medium mixing bowl
- Rubber spatula
- Measuring cups and spoons
- Wire cooling rack
- Offset spatula or butter knife
- Sharp knife for fruit preparation
- Cutting board
Ingredients
For the Cookie Base:
- 1/2 cup (1 stick) unsalted butter, softened
- 3/4 cup granulated sugar
- 1 large egg
- 1 teaspoon vanilla extract
- 1 1/3 cups all-purpose flour
- 1/2 teaspoon baking powder
- 1/4 teaspoon salt
For the Cream Cheese Frosting:
- 8 oz cream cheese, softened
- 1/2 cup powdered sugar
- 1/2 cup heavy whipping cream
- 1 teaspoon vanilla extract
For the Fruit Toppings:
- 1 cup fresh strawberries, hulled and sliced
- 2 kiwis, peeled and sliced
- 1 cup fresh blueberries
- 1 cup fresh raspberries
- 1 large orange, peeled and segmented
- 1/2 cup green grapes, halved
- 2 tablespoons apricot jam (for glaze, optional)
Instructions
- Prepare the Cookie Base: Preheat oven to 350°F (175°C). In a large mixing bowl, cream together softened butter and granulated sugar until light and fluffy, about 3-4 minutes. Beat in egg and vanilla extract until well combined.
- Mix Dry Ingredients: In a separate bowl, whisk together flour, baking powder, and salt. Gradually add dry ingredients to the butter mixture, mixing until just combined. Don’t overmix.
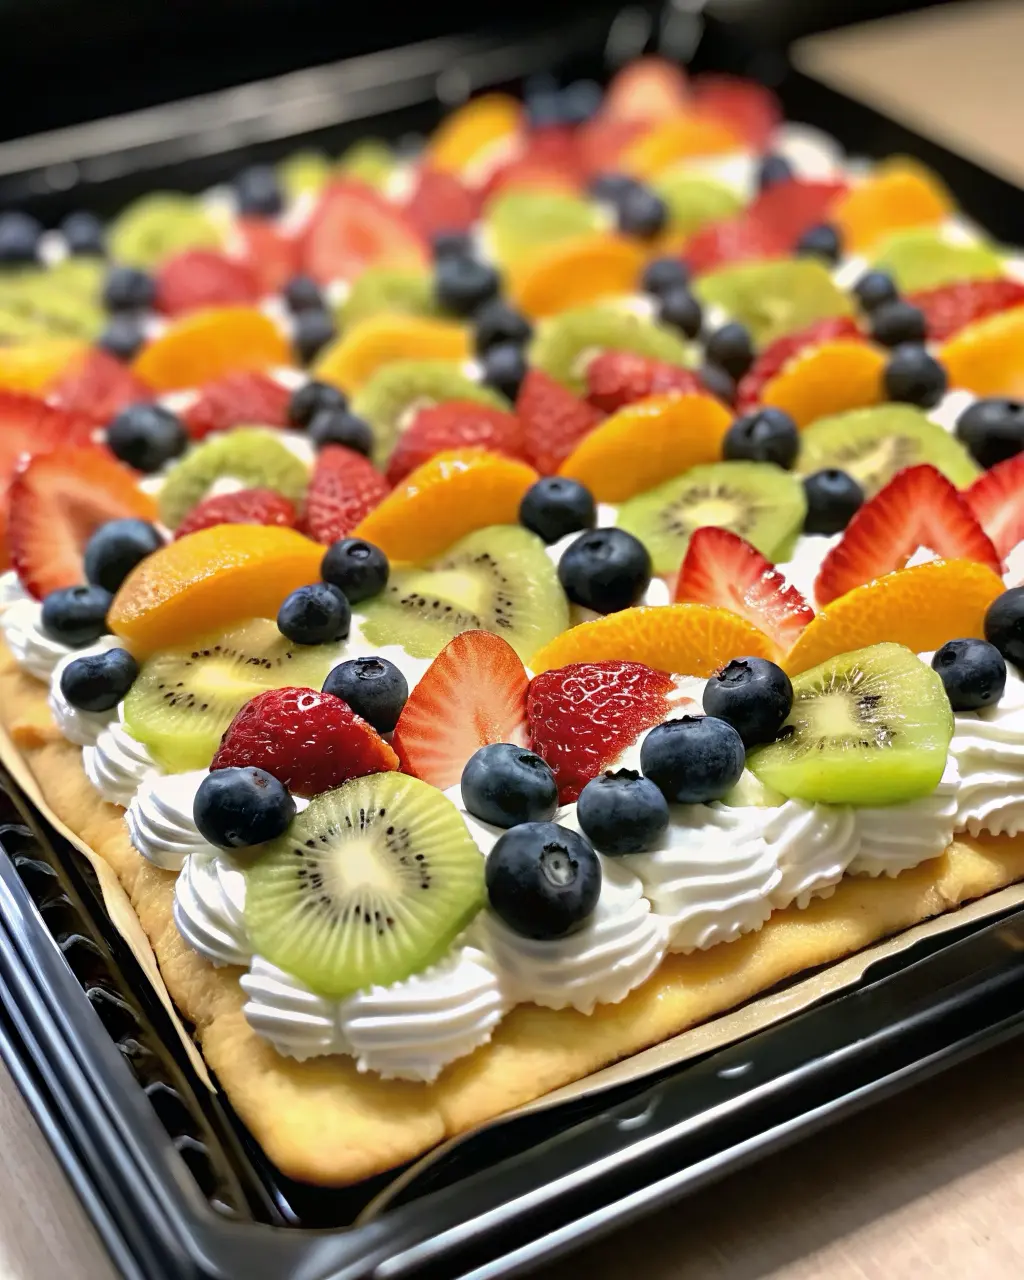
- Shape and Bake: Press cookie dough evenly onto a greased 12-inch pizza stone or large baking sheet, creating a circle about 12 inches in diameter. Bake for 12-15 minutes until edges are lightly golden. Remove from oven and cool completely on a wire rack.
- Prepare Frosting: While cookie cools, beat cream cheese in a medium bowl until smooth. Gradually add powdered sugar, then heavy cream and vanilla extract. Beat until mixture is smooth and spreadable, about 2-3 minutes.
- Assemble the Pizza: Once cookie base is completely cool, spread cream cheese frosting evenly over the surface using an offset spatula, leaving a small border around the edges.
- Arrange Fruits: Artistically arrange prepared fruits over the frosting layer. Start with larger fruits like strawberry slices and kiwi, then fill in with smaller berries and grapes to create a colorful, appealing pattern.
- Optional Glaze: If desired, warm apricot jam slightly and brush over fruits for a glossy finish.
- Chill and Serve: Refrigerate Fruit Pizza for at least 30 minutes before slicing and serving to allow frosting to set properly.
Notes
- Ensure all ingredients are at room temperature for best mixing results
- The cookie base should be completely cool before adding frosting to prevent melting
- Pat fruits dry with paper towels before arranging to prevent excess moisture
- Use a sharp pizza cutter or large knife to slice cleanly through all layers
Tips for Success
Choose fruits that are ripe but still firm to maintain their shape and prevent excess juice from making the cookie base soggy. Prepare all fruits just before assembly to maintain their fresh appearance and prevent browning. When spreading the cream cheese frosting, work gently to avoid tearing the cookie base, and ensure even coverage for the best presentation. For the most attractive Fruit Pizza, arrange fruits in concentric circles or create patterns with alternating colors. Consider the natural colors of your chosen fruits to create the most visually appealing rainbow effect.
Additional Tips and Variations
Transform your basic Fruit Pizza into exciting variations by experimenting with different cookie bases such as chocolate chip, oatmeal, or even brownie bases for a richer foundation. Try flavored cream cheese frostings by adding lemon zest, almond extract, or even a touch of honey for different flavor profiles. Seasonal variations work wonderfully – use autumn fruits like sliced apples and pears with a cinnamon-spiced frosting, or winter citrus fruits for a bright, refreshing twist. For special dietary needs, substitute gluten-free flour in the cookie base or use dairy-free cream cheese alternatives. Individual mini Fruit Pizzas made in muffin tins create perfect portion-controlled servings for parties.
Frequently Asked Questions (FAQ)
Q: Can I make Fruit Pizza ahead of time? A: Yes, you can prepare the cookie base and frosting up to 24 hours in advance. Store them separately and assemble with fresh fruits just before serving for the best texture and appearance.
Q: What’s the best way to prevent the cookie from getting soggy? A: Ensure your cookie base is completely cool before adding frosting, pat fruits dry before arranging, and serve within a few hours of assembly. The cream cheese layer acts as a moisture barrier.
Q: Can I freeze Fruit Pizza? A: While you can freeze the unfrosted cookie base for up to 3 months, it’s not recommended to freeze the completed Fruit Pizza as the fruits and frosting don’t freeze well together.
Q: What fruits work best for this recipe? A: Firm fruits that don’t release much juice work best. Excellent choices include strawberries, kiwis, blueberries, raspberries, grapes, and orange segments. Avoid very juicy fruits like watermelon or overly ripe peaches.
Q: How do I cut Fruit Pizza cleanly? A: Use a sharp pizza cutter or large knife, wiping the blade clean between cuts. Chilling the pizza for 30 minutes before cutting helps achieve cleaner slices.
Conclusion
This delectable Fruit Pizza recipe proves that desserts can be both indulgent and refreshing, combining the comfort of homemade cookies with the natural sweetness of fresh seasonal fruits. The beauty of this recipe lies not only in its stunning visual presentation but also in its versatility and ability to adapt to any season or occasion. Whether you’re creating a centerpiece for a summer gathering, looking for a healthier dessert option that doesn’t sacrifice flavor, or wanting to showcase the beautiful bounty of fresh fruits, this Fruit Pizza delivers on all counts. The combination of the tender cookie base, creamy frosting, and vibrant fruit toppings creates a harmonious blend of textures and flavors that will have your guests asking for the recipe. With proper storage and assembly techniques, you can create a professional-looking dessert that’s surprisingly simple to make, proving that the most impressive treats often come from the most straightforward recipes.
For Ingredients And Complete Cooking Instructions Please Head On Over To Next Page Or Open button (>) and don’t forget to SHARE with your Facebook friends