I LOVED IT!
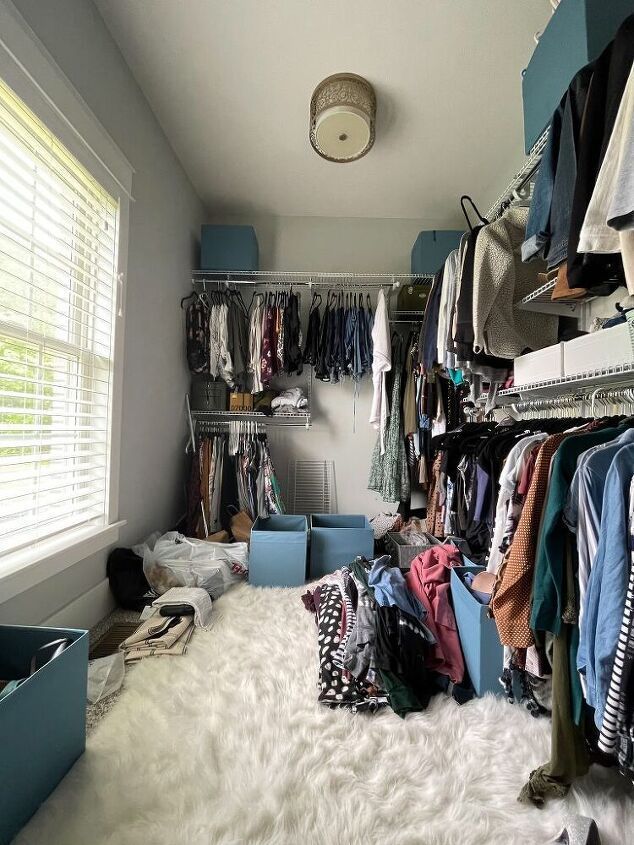
After living with the accessory wall for some time, however, I realized it wasn’t near enough storage for what I needed. I still had several pairs of nice shoes stored in hidden bins and I could never remember what I owned.
I was also new to power tools at the time of install and the shoe shelves weren’t exactly stable (aka, the brackets were coming out of the wall).
While beautiful, the wall just wasn’t functional. It made the most sense to start here.

I knew a few things going into the design of this project.
1- I still wanted this space to remain an accent wall. (Think fun AND function)
2- I wanted to build something that was easy to reposition.
3 – It was important that it be easy to replicate. (So I could share it with YOU!)
I took all of these factors into consideration when I planned out the design.
How to Make a DIY Shoe Rack with a Unique Finish
I’m loving the slat wall trend right now so figuring out a unique way to bring it into the closet was a MUST!
I began by searching for unique slat wall shelf ideas.
After doing a little bit of research I found inspiration in this SLAT WALL SHELF DESIGN.
What I discovered is that if slats were positioned evenly on the wall, with the gap between each slat being the exact width of the shelf thickness, a shelf would stay in place perfectly.
I decided to use this concept and design a unique shoe display for the corner of the closet.

How Do I Make my Own Shoe Organizer at Home?
Project Materials: These will vary slightly depending on if you plan to stain or paint your boards. I noted variables in (parentheses).
- 1×2 pine boards (You could also use MDF boards for a more cost-effective option, however, you would need to paint them.)
- 1×10 pine board (Can also use MDF, if painting, or birch plywood, if staining, to be more cost-effective)
- 3/4 inch Edge Banding (for wood finish)
- Finish of choice (Paint, Stain or Clear Matte Polycrylic)
- Construction Adhesive (optional, pending permanency)
- 2-2.5 inch Brad Nails
- Wood Filler (or Putty for painted surfaces)
Project Tools:
- Measuring Tape
- Pencil
- Speed Square
- Miter Saw
- Orbital Sander
- Table Saw (if you need to rip down plywood for shelves)
- Brad Nailer
- 4-inch Foam Roller
- Level
- Stud Finder
How do you make easy shoe shelves?
NOTE: If you are more of a visual learner like I am, take a peek at my INSTAGRAM stories of this project.
Decide how many slats you will be using. I knew that I wanted the height of the whole piece to be approx 4 ft tall with shelves made if 3/4″ thickness. After doing some (not so) quick math I determined I needed 21 slats to make this happen.
Step 1: Layout The Desired Pattern
Since I wanted the slats to lay in a non-symmetric geometric pattern I first laid out all of the slats I would be using to make sure they would still balance from top to bottom.
I then took a speed square to mark a straight line where I would make the cuts that would end up fitting into the corner of the wall.


Step 2: PREP THE BOARDS
I used a MITER SAW to make my cuts and an ORBITAL SANDER to smooth the boards and the edges. I started with 120 grit sandpaper then did another once over with 220, then 320 for an ultra-smooth finish.

The next part will vary depending on if you are painting or staining.
I chose to keep the natural wood look for this project so I simply sealed the boards.
No matter what finish you choose, only paint/seal the short ends of the boards at this point. Leave what will become the face of the board alone until after nailing and patching holes.

STEP 3: INSTALL THE BOARDS
NOTE: If you want this accent wall to be more permanent (and you are applying it directly to drywall) it’s smart to use construction adhesive on the back of the boards before nailing them in. I skipped this part because my wall was wallpapered.
Before installing the boards, I marked my studs with a MAGNETIC STUD FINDER.

To install the boards simply place the center board on the wall and use a level to make sure it is straight.
Use a BRAD NAILER to attach the first board into the studs.
Grab a spacer the same thickness as the future shelves. Since my shelf material is 3/4in thick I used a spare 1×2 as my spacer.


Nail the rest of the boards into place using the same spacer between each board.


STEP 4: Patch & sand nail holes
There will be a TON of nail holes after the boards are installed. Patch them with a WOOD FILLER or PUTTY and then sand off the excess.

step 5: Cut & finish the Shelves
I chose to save the shelf boards for last so that I could add interest with utilizing different lengths.
I used birch plywood and cut shelves to a variety of lengths and 9″ deep. I have a small foot (size 6 in women’s) so an extra inch may be necessary to accommodate for a larger shoe.

Since plywood has rough edges, I chose to finish off the ends with 3/4in BIRCH EDGE BANDING. This product is super easy to use and requires only a pair of scissors and an iron. You can watch the INSTAGRAM HIGHLIGHT of this project to see how I did it!
What Else Can You use a Shoe Rack For?
I styled the shelves with shoes and a few handbags. How cute would this look with a HAT STAND or SUNGLASSES DISPLAY or JEWELRY HOLDER? The options are really endless!

This slat wall accent look is super sleek and modern and definitely gives this space a bonus personal touch. You just learned how to complete this DIY shoe rack project – time to go and make some magic happen!


Related posts: DIY Poster HangerEasy Outdoor End TablesThe Best Outdoor Curtains & How To Clean Them
For Ingredients And Complete Cooking Instructions Please Head On Over To Next Page Or Open button (>) and don’t forget to SHARE with your Facebook friends