Poor Man’s Husband Casserole

advertisement
advertisement

Peanut Butter Chocolate Gooey Butter Cake: A Decadent Dream Come True

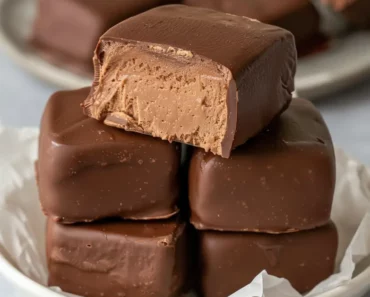
The perfect marriage of peanut butter and chocolate has always been a crowd-pleasing combination, but when transformed into a gooey butter cake, it becomes an irresistible masterpiece that will have everyone begging for seconds. This indulgent dessert takes the classic St. Louis-style gooey butter cake and elevates it with the rich, nutty warmth of peanut butter and the deep, complex notes of chocolate. Each bite delivers a harmonious blend of textures – a tender, buttery crust topped with a luxuriously creamy filling that melts in your mouth.

What makes this version truly special is its ability to combine comfort food nostalgia with sophisticated flavors. The traditional gooey butter cake, born in the 1930s, gets a modern twist that speaks to our contemporary love for the peanut butter-chocolate combination. The base layer provides a perfect foundation, while the filling achieves that magical sweet spot between cake and custard. It’s a dessert that manages to be both casual enough for family gatherings and elegant enough for special occasions.

This recipe is particularly appealing because it strikes an ideal balance between ease of preparation and impressive results. Even novice bakers can achieve success with this forgiving recipe, yet the end result looks and tastes like it came from a high-end bakery. The ingredients are readily available in most pantries, making it a perfect last-minute dessert option that doesn’t sacrifice quality or taste. Whether served warm with a scoop of vanilla ice cream or chilled with a cup of coffee, this Peanut Butter Chocolate Gooey Butter Cake promises to become a treasured addition to your dessert repertoire.

Recipe Introduction: A Symphony of Sweet and Nutty Flavors

Prepare to embark on a baking journey that combines the beloved flavors of peanut butter and chocolate in a uniquely textured dessert. This Peanut Butter Chocolate Gooey Butter Cake features a chocolate cookie crust topped with a creamy, peanut butter filling that creates the perfect balance of sweet and salty. The result is an incredibly moist, rich dessert that somehow manages to be both light and decadent at the same time. Perfect for potlucks, family gatherings, or any occasion that calls for an unforgettable dessert.

Storage Options

  • Room Temperature: Store in an airtight container for up to 2 days
  • Refrigerator: Keep fresh for up to 5 days when stored in an airtight container
  • Freezer: Can be frozen for up to 3 months when properly wrapped in plastic wrap and aluminum foil

Summary:

  • Prep Time: 20 minutes
  • Cook Time: 40-45 minutes
  • Total Time: 1 hour 5 minutes
  • Servings: 16 squares
  • Difficulty Level: Medium

Equipment:

  • 9×13 inch baking pan
  • Electric mixer (stand or hand-held)
  • Mixing bowls
  • Measuring cups and spoons
  • Spatula
  • Parchment paper
  • Non-stick cooking spray

Ingredients: For the Crust:

  • 1 box chocolate cake mix
  • 1 large egg
  • 1/2 cup unsalted butter, melted

For the Filling:

  • 8 oz cream cheese, softened
  • 1 cup creamy peanut butter
  • 3 large eggs
  • 1 teaspoon vanilla extract
  • 16 oz powdered sugar (about 4 cups)
  • 1/2 cup unsalted butter, melted
  • 1/4 teaspoon salt

Instructions:

  1. Preheat oven to 350°F (175°C). Line a 9×13 inch baking pan with parchment paper and spray with non-stick cooking spray.
  2. For the Crust:
    • In a large bowl, combine chocolate cake mix, egg, and melted butter
    • Mix until well combined
    • Press mixture evenly into the prepared pan
  3. For the Filling:
    • In a large bowl, beat cream cheese and peanut butter until smooth
    • Add eggs one at a time, beating well after each addition
    • Mix in vanilla extract
    • Gradually add powdered sugar, mixing until well combined
    • Add melted butter and salt, beat until smooth
  4. Assembly and Baking:
    • Pour filling mixture over the crust, spreading evenly
    • Bake for 40-45 minutes until the top is lightly golden and the center is still slightly jiggly
    • Do not overbake – the center should be gooey
    • Allow to cool completely before cutting

Notes:

  • For best results, ensure all refrigerated ingredients are at room temperature before starting
  • The center will continue to set as it cools
  • A knife inserted into the center should come out with moist crumbs
  • Cut into squares while completely cool for cleanest cuts
  • Can be served slightly warm or chilled, according to preference
  • Dust with additional powdered sugar before serving if desired
  • The cake will sink slightly in the middle as it cools – this is normal and creates the signature gooey texture
S

make recipe of Poor Man’s Husband Casserole

Poor Man’s Husband Casserole: A Hearty Budget-Friendly Classic

This humble yet satisfying casserole earned its quirky name by being both economical and husband-approved – a filling, flavorful dish that stretches simple ingredients into a complete meal. Combining ground beef, potatoes, and vegetables in a creamy sauce, this casserole represents the best of comfort food cooking: affordable, filling, and deliciously satisfying. It’s the kind of meal that reminds us that good food doesn’t need to be fancy or expensive to bring warmth and contentment to the dinner table.

Recipe Introduction: Comfort Food on a Budget

Poor Man’s Husband Casserole is the epitome of practical home cooking, transforming basic pantry staples into a hearty, comforting meal. This all-in-one dish features layers of seasoned ground beef, tender potatoes, and vegetables bound together in a creamy sauce. Perfect for busy weeknights, this casserole delivers maximum flavor with minimal fuss and expense.

Storage Options

  • Room Temperature: Not recommended for longer than 2 hours
  • Refrigerator: Store in an airtight container for up to 4 days
  • Freezer: Can be frozen for up to 3 months in a freezer-safe container

Summary:

  • Prep Time: 20 minutes
  • Cook Time: 45 minutes
  • Total Time: 1 hour 5 minutes
  • Servings: 6-8
  • Difficulty Level: Easy

Equipment:

  • 9×13 inch baking dish
  • Large skillet
  • Cutting board
  • Sharp knife
  • Measuring cups and spoons
  • Mixing bowls
  • Aluminum foil

Ingredients:

  • 1 lb ground beef
  • 4 medium potatoes, thinly sliced
  • 1 medium onion, diced
  • 2 cups frozen mixed vegetables
  • 1 can (10.5 oz) cream of mushroom soup
  • 1 can (10.5 oz) cream of celery soup
  • 1 cup milk
  • 2 cloves garlic, minced
  • 1 teaspoon paprika
  • 1 teaspoon dried thyme
  • Salt and pepper to taste
  • 1 cup shredded cheddar cheese
  • Optional: 1 cup crushed potato chips or breadcrumbs for topping

Instructions:

  1. Preheat your oven to 350°F (175°C) and grease a 9×13 inch baking dish.
  2. Brown the Meat:
    • In a large skillet, brown ground beef over medium heat
    • Add diced onion and garlic, cook until onion is translucent
    • Season with salt, pepper, paprika, and thyme
    • Drain excess fat if needed
  3. Prepare the Sauce:
    • In a mixing bowl, combine cream of mushroom soup, cream of celery soup, and milk
    • Whisk until smooth
  4. Layer the Casserole:
    • Place half of the sliced potatoes in the bottom of the baking dish
    • Top with half of the ground beef mixture
    • Add half of the frozen vegetables
    • Pour half of the soup mixture over the layers
    • Repeat layers with remaining ingredients
  5. Finish and Bake:
    • Cover tightly with aluminum foil
    • Bake for 45 minutes
    • Remove foil, add shredded cheese and optional topping
    • Bake uncovered for an additional 10-15 minutes until potatoes are tender and cheese is melted

Notes:

  • Slice potatoes uniformly thin (about 1/8 inch) to ensure even cooking
  • Can substitute ground turkey or chicken for the beef
  • For extra flavor, add a dash of Worcestershire sauce to the meat while browning
  • Make ahead tip: Assemble casserole up to 24 hours in advance, refrigerate, and bake when ready
  • If using frozen potatoes, no need to thaw before layering
  • Add more milk if mixture seems too thick
  • Test potato doneness with a fork before adding cheese topping
  • Let rest for 10 minutes before serving to help layers set
  • Leftovers often taste even better the next day as flavors continue to meld

For Ingredients And Complete Cooking Instructions Please Head On Over To Next Page Or Open button (>) and don’t forget to SHARE with your Facebook friends